

Flattening prevents
others from lifting material such as clip art, out of the PDF. Securing prevents others from editing the
PDF--a must-do if you create products for the internet.
If you can select, copy and paste
pictures or text from your PDF file, it is not flattened and secured.
Please let me know if you have any suggestions or improvements. Thanks so much!
If you'd like all this info in a convenient PDF, How To Flatten and Secure Files, it's here and it's free.
Save as Adobe PDF
1)
Open a PowerPoint completed file
These
steps will also work for a
Word
Document.
2)
File/ Save as Adobe PDF (left nav bar)
3)
[Name it]/ Save as type: PDF files/ Save [replace
any older version]
4)
[The PDF will open in Acrobat. Check it for accuracy and correct layout!]

Flatten the PDF

Flatten the PDF
5)
Tools [top tool bar]/ Print Production [center
pop-up]
6)
Flattener Preview [far right nav bar]
7)
Highlight: None [NOTE: IF KEEPING ALL PREVIOUS SETTINGS,
SKIP TO # 15 BELOW]
8)
Preset: High resolution
9)
Raster: 100
10)
Line Art: 1200 ppi
11)
Gradient 300 ppi
12)
☒ preserve
overprint (check)
13)
Compression
setting for flattener:
a.
Monochrome:
CCITT Group 4
b.
Grayscale:
ZIP
c.
Color:
JPEG2000
14)
Quality:
maximum
15)
Apply to
PDF/ All pages/ OK / Apply/ Yes
16)
[Close out
Flattener Pop-up]
Faint
White Lines – PROBLEM & SOLUTION
Sometimes, after flattening, you will see
very faint white lines. These can appear in a box shape around your clip art
images or text boxes—often only on your cover page.
When you print, these lines will not show
up.
You CAN, however, erase the lines from
your PDF. The solution comes from Adobe:
Solution 1: Export as PDF 1.4 or
later.
In the Export Adobe PDF General settings,
select Acrobat 5 (PDF 1.4) or higher from the Compatibility options.
Solution 2: Turn off the Smooth
Line Art option in Acrobat.
1.Choose
Edit > Preferences (Windows), or Acrobat > Preferences (Mac OS) to open
the preference dialog box.
2.In
Categories > Page Display deselect the option Smooth Line Art, and then
click OK.
For more solutions to this and other
problems,
visit Adobe.com

Secure the PDF
17)
Tools
(Top tool bar)[With older versions of Microsoft,you may have to click on "Document" tab]
18)
Protect [right
side, nav bar]
19)
Restrict
Editing [Top center tool bar]
20)
[Enter my
password twice, as indicated; use letters, numbers and symbols for best
security]/ OK/ OK
21)
More
Options (Top center toolbar)
22)
Security
Properties
23)
Description TAB
a.
File [Name of Product]
b.
Title [Change this from ppt presentation to the
same as the file name]
c.
Author: [Author’s name]
d.
Subject: [eg, Phonics]
e.
Keywords: [List all words in lowercase, with a
comma. Add my author’s name, and my blog
name]
FOR KEYWORD METADATA, I create a word doc in my product folder called: [PRODUCT NAME] TEXT. So if I ever have to re-create my PDF, I simply copy and paste the keywords.
FOR KEYWORD METADATA, I create a word doc in my product folder called: [PRODUCT NAME] TEXT. So if I ever have to re-create my PDF, I simply copy and paste the keywords.
24)
Additional metadata (tab on center, right)
a.
Copyright status/ copyrighted
b.
Copyright notice/ [type:] © [YEAR] [MY NAME]
e.g., © 2015 Renee Dawn
[For ©, press "number lock" (this is optional on some keyboards), hold down the alt key, press 0169 on tiny keyboard to the right side of alphabet keyboard]
e.g., © 2015 Renee Dawn
[For ©, press "number lock" (this is optional on some keyboards), hold down the alt key, press 0169 on tiny keyboard to the right side of alphabet keyboard]
c.
OK
25)
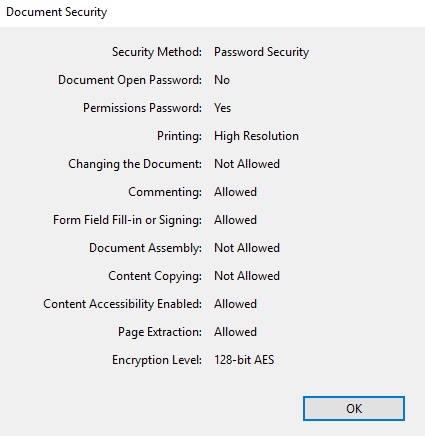
Security TAB
a.
Security method: password security [NOTE: IF
KEEPING ALL PREVIOUS SETTINGS, SKIP TO # k BELOW]
b.
Change settings (tab on far right)
c.
DO NOT CHECK: Require a password to open
document
d.
DO CHECK: Restrict editing and printing
e.
Printing allowed: High resolution
f.
Changes allowed: commenting, filling in form
fields, signing
g.
DO NOT CHECK: Enable copying of text…
h.
DO CHECK: Enable text access…for visually
impaired
i.
Compatibility: Opens with Acrobat 7 or higher
(NOTE: lower than 7 is not as secure!)
j. YES: Encrypt all document contents except metadata [Do NOT CHECK the 2 other boxes; this allows search engines to find your metadata]
k.
OK/OK
The security pop-up should look like this:

The Password Security Settings should look like this (after you click
“Change Settings”):

And, in "Show Details"...
Save the Final PDF
26)
File (Top, Far left)
27)
Save as/ Save as PDF
28)
[Choose location/ Folder]
29)
NOTE: This will replace the un-flattened and
unsecured file by the same name.
30)
[Name the file in a way that indicates to you it is
secured]:
31)
E.g.; Phonics Fun + [The plus sign indicates to you that it
is flattened and secured]
32)
Save [Note: the PDF isn’t secure until you save
it]/ Yes
Check the Final PDF
33)
Must check the final PDF for correct
layout of pages, clip art, etc.
34)
Upload the flattened and secured PDF
About Adobe:
Adobe Acrobat Pro DC is the best program, by far, for flattening and securing PDFs.
If you're a teacher or student, you can save quite a lot by buying the Student and Teacher Edition. Here's the Windows or Mac version. You can upload it instantly, and begin using the trial version for a month before you must confirm your teacher/student status:
IMPORTANT: Please read the verification process carefully before you purchase. If you do not qualify for Teacher or Student status, you will be obligated to pay the full price.

Special thanks to Laurah J for her
cool video on securing PDFs.
Many preview files when flattened, become too large to upload to TpT. The solution I found is:
1) In Flattener Preview page, Preset: Low Resolution, and Compression Settings/ Quality: Minimum.
Be sure to change these back to High Resolution and Maximum for the actual resource (that is, not a preview).
2) When Saving the Final Preview: File/ Save As/ Reduce File Size (tiny check box at the top)/ Choose Folder/ [Type: File Name PREVIEW +]
MUST:

Special Notes for Preview Files:
Many preview files when flattened, become too large to upload to TpT. The solution I found is:
1) In Flattener Preview page, Preset: Low Resolution, and Compression Settings/ Quality: Minimum.
Be sure to change these back to High Resolution and Maximum for the actual resource (that is, not a preview).
2) When Saving the Final Preview: File/ Save As/ Reduce File Size (tiny check box at the top)/ Choose Folder/ [Type: File Name PREVIEW +]
If your Preview file is still too large…
2) Upload
the file, compress it and download it.
3) Repeat
the steps 1 and 2 in Preview Files section above, to flatten and secure!
Also, for Preview Files: In your password
security > settings > change settings > printing allowed > [select NONE]
Change BACK to “High Resolution”
for a printable resource!
If you'd like this entire file as a convenient PDF, How To Flatten and Secure Files, it's here--and it's free.
Best wishes to you on flattening and securing PDFs!
Best wishes to you on flattening and securing PDFs!
This is great! Thanks for the clear step-by-step directions!
ReplyDeleteTeacher Ink: How To Flatten And Secure Adobe Pdfs >>>>> Download Now
Delete>>>>> Download Full
Teacher Ink: How To Flatten And Secure Adobe Pdfs >>>>> Download LINK
>>>>> Download Now
Teacher Ink: How To Flatten And Secure Adobe Pdfs >>>>> Download Full
>>>>> Download LINK Z2
Thanks so much for letting me know you found this to be helpful!
ReplyDeleteThanks so much for this marvelous post! I am wondering about the order of the procedure. I noticed that after I complete the More Options Security settings (having already restricted the editing) that the option to Restrict Editing is available again. Normally after restricting editing for a document, that option is grayed out. But when I restrict editing before AND after the More Options stuff, I seem to lose quality. Any suggestions? Thanks.
ReplyDeleteHi, Ann. I'm glad this has been helpful to you. I only use the "Restrict Editing" tab once, then More Options (Security Properties). I never use the Restrict Editing tab again. Some people say that it's the flattening process that can slightly deteriorate a file, but that it is not a factor for most uses. Besides, flattening is required by many clip artists, and it must be done if you use their work.
ReplyDeleteThis comment has been removed by the author.
ReplyDeleteHi Renee!
ReplyDeleteThanks for this detailed break down of flattening PDF's. You would not believe how many times I have searched for just such information!
There is something I wanted to note that might be of interest to your other readers.
This process does not "flatten" your text. That means someone could possibly copy and paste your text, which might be a concern for some people. If you want to keep people from copying and pasting your text, I believe you need to select "Convert All Text to Outlines" in the Flattener Preview.
Thanks again for your help!
Kim
I appreciate you input, Kim! My text appears to be flattened--that is, it can't be copied or pasted. But others may find that they need to select "convert all text to outlines," so thanks for that.
ReplyDeleteThis is soooooo helpful! Thank you for this!
ReplyDeleteYou're so welcome, Elly! I was surprised I couldn't find a simple, thorough step-by-step on the web--so I pieced it together myself.
ReplyDeleteThank you so much for this! I have been working on flattening/securing my files ALL DAY! Question though... when I go through these steps, my clipart (PNG files) have a dark rectangular box around them... How do I fix this?
ReplyDeleteI'm glad this has helped you! I'm not sure what's causing rectangular boxes around the clip art. Is it only some clip art? Maybe the files are not clean. I've heard of flattening creating very thin clear lines around some images (and not often). The consensus is that it simply can't be avoided, but that users will accept it. When I have a question, I google it to find more answers. Best wishes!
ReplyDeleteHello again, Renee,
ReplyDeleteI have used this technique so many times, and send you appreciative thoughts! Recently on TpT there is talk of avoiding "key word stuffing" in descriptions. Do you think that the key word section in the Security Properties Description window is key word stuffing? Thanks, Ann, Many Roads to Reading
Hi Ann! I glad you found this helpful--and thanks so much for letting me know. Keyword stuffing refers to a product listing description. It is not buyer-friendly. Conversely, listing all your keywords in an Adobe PDF will help buyers who are looking for a product that matches your keywords.
DeleteI can't thank you enough for these directions!! I was able to dive right in to my work instead of spending the day figuring out the program.
ReplyDeleteThanks for telling me this was helpful! I appreciate that--as I spent many hours figuring it all out, and I'm happy to share what I learned. :-)
ReplyDeleteHi, Thank you for this detailed description of how to flatten a pdf. I am so embarrassed that I can't figure it out. I have followed the instructions and it still doesnt work. I can lift the images. My file says "secured" on the end of the title (not by me, the program adds the word secured), so I thought I was fine but as I said I can still lift the images. Any thoughts on what I am doing wrong?? thanks!!
ReplyDeleteHi Cindy, I'm so sorry this is not working for you. I wish I had the answer, but I'll continue to research and will return here to let you know if I find something more.
DeleteCindy, I've noticed that if you skip a step, the file will not be secure. For instance if you don't use your security password in Adobe (step # 20). It may appear you are securing it, but you're really not. Just another thought.
DeleteAny ideas on the white boxes left behind on some images? Am I missing a step?
ReplyDeleteHi, Lindsey. I've seen many forum discussions on this. The consensus is that flattening can create ultra-thin white boxes around some images, but that for most uses, it is negligible. If I find a better solution, I'll post it here!
ReplyDeleteJust what I was looking for! Thank you!
ReplyDeleteHi Renee! Someone shared your tutorial in a FB group and when I tested out your flattening directions I was still able to select individual images and text. Did I miss something or are you also able select individual objects before securing?
ReplyDeleteIf you can select, copy and paste files from your finalized PDF doc, it's not secured. Be certain you did not skip any steps, such as typing in your password, or saving the PDF at the end.
DeleteThank you for this excellent step by step guide to flattening and securing. I could not have done it with your directions! Thank you! I am curious about customers' ability to open the product if they do not have Adobe Acrobat Pro. Is that an issue? Also, when I see a product that just says PowerPoint does that mean it is not flattened and secured? Thanks again! This is awesome!
ReplyDeleteHi Jeannie, I'm glad you found this helpful. Anyone can open a PDF file, as long as you follow the directions--which allow opening and reading the file. A PowerPoint is NOT flattened and secured.
DeleteJeannie, to clarify about ppt, you CAN save each ppt page as a jpg, then re-insert it into the ppt. The page will be flattened (no one can lift an image out), but not secured (others can take the pages).
DeleteHi Renee, Thank you so much for the directions. I have a question about one of the last steps. I can click the apply to all check box but am unable to click Yes at the bottom because it is cut off and moving around the screen does not help. Do you know what I might be doing wrong? Thanks!
ReplyDeleteHi Kara, I'm not sure which section you're referring to, but sometimes you can override the mouse problem by simply clicking ENTER on your keyboard.
ReplyDeleteThanks for helping with this. I am in the midst of learning several Adobe products and this was very helpful.
ReplyDeleteGreat, Laura! Soon you'll get to the point where you can almost do it blindfolded :-) Renee
DeleteThis has been a life saver for me! I follow your steps every time! On my last product for TPT, some of my pictures would not show up. They came out as black rectangles on the secured PDF. I tried checking minimum and the lower resolution but it still did not work. Do you have any ideas? I would really appreciate it.
ReplyDeleteTHANK YOU for this post! It is incredibly helpful; pinning for future reference as I'm sure it will take me some time to memorize the steps.
ReplyDeleteHi, Renee,
ReplyDeletePeople on TeachersPayTeachers are talking about the Bearpack FlatPack. Your technique has helped me so much that I don't know whether I should spend the money on FlatPack. Do you know whether it replaces your method? I know that I trust your method! Thanks,
Ann
Hi Ann, I haven't tried FlatPack, but Bearlab has some interesting resources. Adobe Acrobat offers many additional features, and it's the tried and true gold standard for flattening and securing.
ReplyDeleteUsually, the file conversion software program that's employed for PDF to Phrases doc may also extract the photographs, as it's. Nonetheless, when it's a must to share these pictures with the others, will probably be higher to avoid wasting them in JPG format. If you want to learn more about this topic please visit https://2pdf.com
ReplyDeleteI’m going to read this. I’ll be sure to come back. thanks for sharing. and also This article gives the light in which we can observe the reality. this is very nice one and gives indepth information. thanks for this nice article... File share
ReplyDeleteTeacher Ink: How To Flatten And Secure Adobe Pdfs >>>>> Download Now
ReplyDelete>>>>> Download Full
Teacher Ink: How To Flatten And Secure Adobe Pdfs >>>>> Download LINK
>>>>> Download Now
Teacher Ink: How To Flatten And Secure Adobe Pdfs >>>>> Download Full
>>>>> Download LINK rJ